
Setting up Workglue takes about five minutes for the core onboarding, plus additional time to connect QuickBooks Online, PaintScout, and configure your account settings.
Before you start
You will need an email address for your account, your company information (name, contact email, contact phone), and a payment method for your subscription. Workglue includes a 14-day free trial on new subscriptions, so you can complete the full setup and explore the product before being charged.
If you plan to integrate with QuickBooks Online or PaintScout, have those account credentials ready as well. The order in which you connect integrations matters and is covered later in this article.
Step 1: Sign up
- Go to the Workglue sign-up page.
- Enter your Email, Password, and Confirm Password.
- Select Sign Up.
You can also sign up using a Google account. Select Sign up with Google and authorize Workglue to use your Google login.
If you already have a Workglue account, select Sign in Now instead.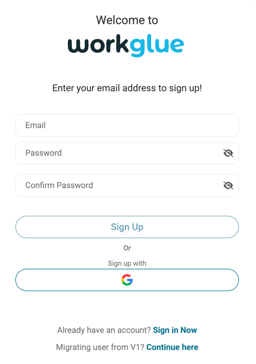
Step 2: Enter your Account Details
After signing up, the onboarding flow opens automatically.
- Enter your First Name.
- Enter your Last Name.
- Enter your Company Name.
- Enter your company's Contact Email.
- Enter your company's Contact phone.
- Select the checkbox to agree to the Terms of Service.
- Select Next.

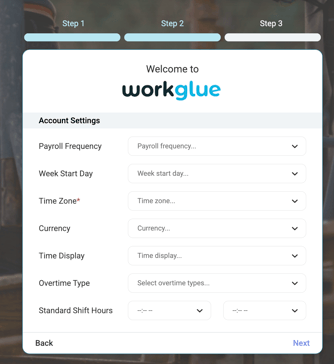
Step 3: Configure your Account Settings
Account Settings control how Workglue handles payroll, scheduling, time tracking, and currency for your company. These settings can be changed later in My Account > Settings.
- Select your Payroll Frequency.
- Select your Week Start Day.
- Select your Time Zone. This field is required.
- Select your Currency.
- Select your Time Display format.
- Select your Overtime Type.
- Set your Standard Shift Hours by selecting a start and end time.
- Select Next.
Set the Time Zone to match the location where most of your work is scheduled. Time Zone affects how scheduled jobs, time clock entries, and timesheets display across your account.
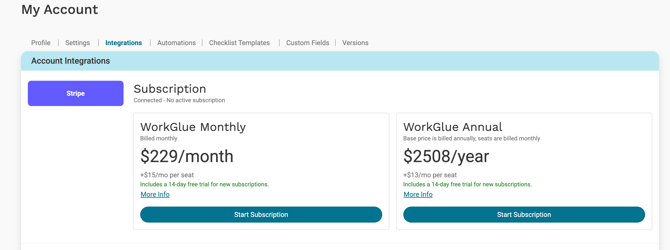
Step 4: Activate your subscription
The final onboarding step prompts you to continue to Account Integrations and select a subscription before using Workglue. Workglue requires an active subscription to access the product. New subscriptions include a 14-day free trial.
- Select Continue.
- You are taken to My Account > Integrations, where the Account Integrations section displays the available subscription plans.
- Choose the plan that fits your business.
Select More Info under either plan to view the full pricing details, including base price and per-seat cost.
How to start your subscription
- Select Start Subscription under the plan you want.
- Enter your payment details in Stripe.
- Complete the checkout.
Once your subscription is active, the Subscription section shows a connected status and you have full access to Workglue.
Your 14-day free trial begins as soon as your subscription is activated. You will not be charged until the trial ends.
Step 5: Connect your integrations
After your subscription is active, the recommended next step is connecting your integrations. The order matters, especially if you use both QuickBooks Online and PaintScout.
Recommended integration order
- QuickBooks Online first. QuickBooks Products & Services sync into Workglue as cost codes, which PaintScout then maps to during its own setup. Connecting QuickBooks first ensures your cost codes are in Workglue before you set up PaintScout. See QuickBooks Online Integration for setup steps before connecting PaintScout.
- PaintScout second. Once your cost codes are in Workglue, connect PaintScout and complete the cost code mapping. See PaintScout Integration for setup steps.
Do not connect QuickBooks Online directly to PaintScout. This creates duplicate customer records. Always connect QuickBooks to Workglue, and let PaintScout pull cost codes from Workglue.
Step 6: Configure your Custom Fields and Settings
Custom Fields and Settings are where you configure the Job Stages, Job Types, Customer Types, Lead Sources, Cost Codes, File Categories, and Email Templates that your account will use. Setting these up early means every Customer, Opportunity, and Job you create from this point forward uses the right values.
- Go to My Account > Custom Fields.
- Review and configure each section to match how your business operates.
See Custom Fields & Settings for more information.
Step 7: Add your Employees
Employees are the users who will access your Workglue account. Each Employee is assigned a role that controls what they can see and do.
- Go to the Employees page.
- Add each Employee with their name, contact details, role, and position.
- Assign permissions based on what they need access to.
See Employees Overview, How to add an Employee, Employee Roles and Permissions
Step 8: Start using Workglue
With onboarding complete, your subscription active, your integrations connected, your settings configured, and your Employees added, you are ready to start creating records and managing your business in Workglue.
- Create Customer Accounts and Contacts.
- Create Opportunities for new leads.
- Convert Opportunities to Active Jobs when work is sold.
- Schedule workers, track time, and manage job costs.
See Opportunities Overview, Jobs Overview, Scheduling Workers.